 |
| Adafruit 5110 LCD module |
The Nokia 3310 /5110 LCD are both popular for hobbyist projects and educational purposes. Both the Nokia 3310 and Nokia 5110 LCD displays are practically the same. They both use the same Philips PCD8544 controller, resulting in an 84x48 pixel monochrome LCD with a blue backlight.
 |
| Sparkfun 5110 LCD module |
These modules are used on wide variety of applications that require some sort of interface or display data to the user. These modules are very cheap and you can use them with any microcontroller (MCU).
Specifications Nokia 3310 / 5110 LCD
- 84*48 dot matrix LCD (shows 4 lines of characters)
- Price: $2/$3
- Voltage: 3.3V (VERY IMPORTANT NOTE it is not a 5V tolerant LCD module)
- Module size: 45.2mm x 43.1mm
- Model: Nokia 3310 / Nokia 5510
- Controller: PCD8544
There are two popular variants of Nokia 3310/5110 LCD modules using PCD8544 driver IC, one from "AdaFruit" and other from "Sparkfun". The pinout differences are detailed here for reference:
* AdaFruit Sparkfun function notes
* -----------+-----------+----------+----------------------------------
* 1 2 GND
* 2 1 VCC
* 3 7 CLK / SCLK
* 4 6 DIN / MOSI
* 5 5 D/C
* 6 3 CS / SCE
* 7 4 RST
* 8 8 LED no Ilim resistors on "Sparkfun"
Here's an example Arduino sketch for displaying text on a Nokia 3310 / 5110 LCD display:
  // Start of code
/* Usage of this code is at your own risk, although it has been verified * before publishing by our own team. *  The PCD8544 "Nokia" LCD modules seem to come in two popular variants, *  which we will refer to as "AdaFruit" and "Sparkfun", referring to the *  popular online vendors. The pinout differences are detailed here for *  reference: *   *  AdaFruit    Sparkfun    function   notes *  -----------+-----------+----------+---------------------------------- *  1           2           GND *  2           1           VCC *  3           7           CLK / SCLK *  4           6           DIN / MOSI *  5           5           D/C *  6           3           CS / SCE *  7           4           RST *  8           8           LED         no Ilim resistors on "Sparkfun"*/
#include <PCD8544.h>
// A custom glyph (a smiley)...static const byte glyph[] = { B00010000, B00110100, B00110000, B00110100, B00010000 };
static PCD8544 lcd;
void setup() {  // PCD8544-compatible displays may have a different resolution...  lcd.begin(84, 48);
  // Add the smiley to position "0" of the ASCII table...  lcd.createChar(0, glyph);}
void loop() {  // Just to show the program is alive...  static int counter = 0;
  // Write a piece of text on the first line...  lcd.setCursor(0, 0);  lcd.print("Hello, World!");
  // Write the counter on the second line...  lcd.setCursor(0, 1);  lcd.print(counter, DEC);  lcd.write(' ');  lcd.write(0);  // write the smiley
  // Use a potentiometer to set the LCD contrast...  // short level = map(analogRead(A0), 0, 1023, 0, 127);  // lcd.setContrast(level);
  delay(200);  counter++;}
// End of code
Explanation:
- Includes:
- The code includes necessary libraries for SPI communication, general graphics, and the Nokia 3310 display.
- Display Object:
- An Adafruit_PCD8544 object is created to control the display.
- setup() Function:
- display.begin(): Initializes the LCD display.
- display.setContrast(50): Sets the contrast level (50 is a common value).
- display.clearDisplay(): Clears the display before drawing.
- display.setTextColor(WHITE, BLACK): Sets the text color to white (foreground) on a black background.
- display.setTextSize(1): Sets the text size to 1 (the default size).
- loop() Function:
- display.setCursor(0, 0): Sets the cursor to the top-left corner (0, 0).
- display.print("Hello World!"): Prints the text "Hello World!" to the display.
- display.display(): Updates the LCD with the drawn content.
- delay(2000): Pauses for 2000 milliseconds (2 seconds).
- display.clearDisplay(): Clears the display.
- The code repeats this process, displaying "Testing!" after clearing the display and pausing.
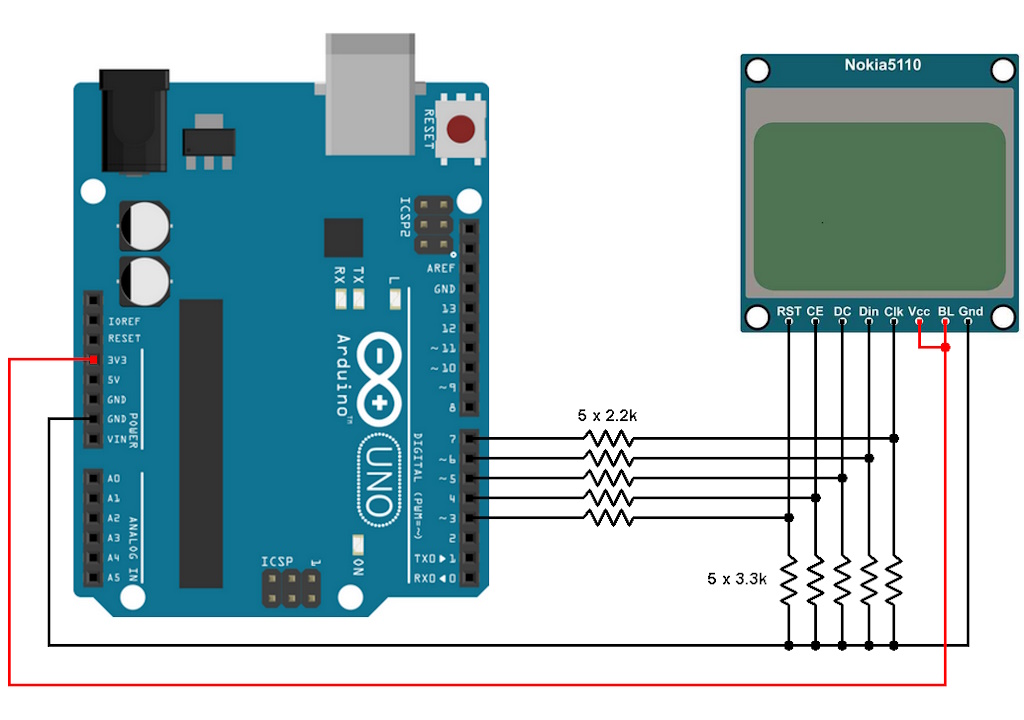
Wiring:
- Pin 1 of LCD is VCC: Connected to Arduino's VCC pin to 3.3V.
- Pin 2 of LCD is GND: Connected to Arduino's GND pin to ground.
- Pin 3 of LCD is SCE (Chip Enable): Connected to Arduino's Digital-pin 7.
- Pin 4 of LCD is RST (Reset): Connected to Arduino's Digital-pin 6.
- Pin 5 of LCD is D/C: Connected to Arduino's Digital pin 5.
- Pin 6 of LCD is DN: Connected to Arduino's Digital pin 4.
- Pin 7 of LCD is SCLK (Clock): Connected to Arduino's Digital 3.
- Pin 8 of LCD is LED (Backlight LED): Optionally can be connected to +5V of Arduino via a 10k Ohm resistor.
Important Notes:
- Download PCD8544 library from this link for Sparkfun 5110 LCD module.
- For Adafruit 5110 LCD module, follow as below
- Make sure to install the necessary libraries in the Arduino IDE (search for "Adafruit PCD8544" and "Adafruit GFX").
- The pin numbers in the wiring scheme may need to be adjusted based on your specific Arduino board and LCD module.
- The Adafruit_PCD8544 library provides various functions for drawing lines, circles, rectangles, and more, as well as for manipulating the display's background and color.
- Consult the Adafruit's PCD8544 documentation for more information and examples.