Whether you want to monitor your home from afar or activate the sprinkler system in your garden with a missed call; then the SIM800L GSM/GPRS module can serve as a solid launching point!
The SIM800L GSM/GPRS module is a miniature GSM modem that can be used in a variety of IoT projects. You can use this module to do almost anything a normal cell phone can do, such as sending SMS messages, making phone calls, connecting to the Internet via GPRS, and much more.
To top it all off, the module supports quad-band GSM/GPRS networks, which means it will work almost anywhere in the world.
Hardware Overview
At the heart of the module is a SIM800L GSM cellular chip from Simcom.
The operating voltage of the chip ranges from 3.4V to 4.4V, making it an ideal candidate for direct LiPo battery supply. This makes it an excellent choice for embedding in projects with limited space.
All the necessary data pins of the SIM800L GSM chip are broken out to a 0.1″ pitch headers, including the pins required for communication with the microcontroller over the UART. The module supports baud rates ranging from 1200 bps to 115200 bps and features automatic baud rate detection.
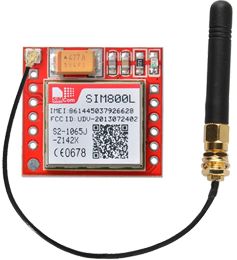
The module requires an external antenna in order to connect to the network. So the module usually comes with a helical antenna that can be soldered to it. The board also has a U.FL connector If you wish to keep the antenna at a distance from the board.
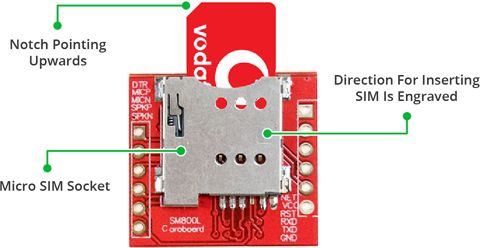
There’s a SIM socket on the back! Any 2G Micro SIM card will work perfectly. The proper way to insert the SIM card is typically engraved on the surface of the SIM socket.
Features
Even though this module is incredibly small—only 1 square inch—it contains a surprising number of features. Some of them are as follows:
- Supports Quad-band: GSM850, EGSM900, DCS1800 and PCS1900
- Connect onto any global GSM network with any 2G SIM
- Make and receive voice calls using an external 8Ω speaker & electret microphone
- Send and receive SMS messages
- Send and receive GPRS data (TCP/IP, HTTP, etc.)
- Scan and receive FM radio broadcasts
- Transmit Power:
- Class 4 (2W) for GSM850
- Class 1 (1W) for DCS1800
- Serial-based AT Command Set
- FL connectors for cell antennae
- Accepts Micro SIM Card
LED Status Indicators
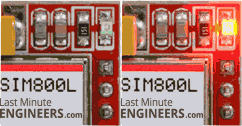
The SIM800L module has an LED that indicates the status of your cellular network. It will blink at different rates depending on the state it is in.
Choosing an Antenna
The SIM800L module requires an external antenna in order to connect to the network, so choosing the right antenna is very important. There are two options available.
The first is a helical antenna that comes with the module and can be soldered directly to the PCB. This antenna is very useful for space-constrained projects. However, be aware that you may face difficulties establishing a connection, particularly if your project is indoors.
Another option is a 3dBi GSM antenna with a U.FL to SMA adapter, which can be found online for less than $3. You can snap-fit this antenna into the small u.fl connector located on the top-left corner of the module. This type of antenna provides better performance and even allows your module to be placed inside a metal box as long as the antenna is outside.
SIM800L GSM Module with 2dBi Duck Antenna
Power Consumption
One of the most important parts of getting the SIM800L module working is supplying it with enough power.
The SIM800L, depending on its state, can be a relatively power-hungry device. The module’s maximum current draw is around 2A (especially during a transmission burst). It won’t usually draw that much, but it may need around 216mA during phone calls or 80mA during network transmissions. This chart from the datasheet summarizes what you can expect:
| Modes | Frequency | Current Consumption |
| Power down | 60 uA | |
| Sleep mode | 1 mA | |
| Stand by | 18 mA | |
| Call | GSM850 | 199 mA |
| EGSM900 | 216 mA | |
| DCS1800 | 146 mA | |
| PCS1900 | 131 mA | |
| GPRS | 453 mA | |
| Transmission burst | 2 A |
Selecting a Power Supply
Because the SIM800L module lacks an onboard voltage regulator, you must select a power supply capable of supplying the SIM800L module within its 3.4V to 4.4V range (preferably 4.0V). Also the power supply must be capable of supplying at least 2A of surge current; otherwise, the chip will repeatedly reset.
Here are some options you can consider.
Li-Po Battery
One of the advantages of Li-Po batteries is that they have a voltage range of 3.7V to 4.2V – perfect for a SIM800L module. Any Li-Po battery with a capacity of 1200 mAh or higher should work, as these batteries can withstand current spikes up to 2 A while maintaining usable voltage.
1200mAh LiPo Battery
DC-DC Buck Converter
We recommend using a 2A-rated DC-DC buck converter, such as the LM2596, with the output voltage set to 4.0V (ideal voltage). These are far superior to linear voltage regulator modules in terms of efficiency.
SIM800L GSM Module Pinout
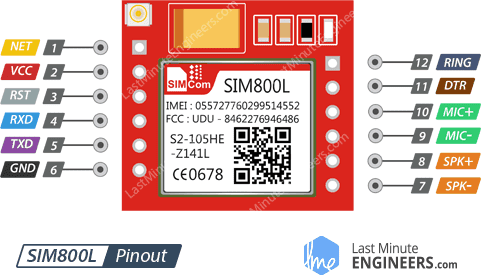
The SIM800L module has 12 pins in total. The following is the pinout:
NET pin is where you can solder the helical antenna that comes with the module.
VCC is the power supply pin. Keep in mind that the SIM800L chip has an operating voltage range of 3.4 V to 4.4 V, so connecting this module to the Arduino’s 5V output is probably going to cause damage to the module. It doesn’t even run on 3.3 V! Use a Li-Po battery or a DC-DC buck converter instead.
RST (Reset) is the reset pin. If you got the module in an absolutely bad space, pull this pin LOW for 100ms to perform a hard reset.
RxD (Receiver) pin is used to send commands to the module. This pin is auto-baud so the baud rate at which you send the “AT” command after reset is the baud rate used.
TxD (Transmitter) pin transmits data from the module to the microcontroller.
GND is the ground pin.
RING pin is the Ring Indicator. This is basically the ‘interrupt-out’ pin from the module. It is by default HIGH and can be configured to go LOW when a call or SMS is received.
DTR pin controls the sleep mode. Pulling it HIGH causes the module to enter sleep mode, disabling serial communication. Pulling it LOW for approximately 50 ms will wake up the module.
MIC± is a differential microphone input. You can connect an external electret microphone to these two pins directly.
SPK± is a differential speaker interface. You can connect a speaker to these two pins directly.
Wiring a SIM800L GSM Module to an Arduino
Now that you are familiar with the SIM800L module, it is time to connect it to Arduino!
To begin, connect the antenna to the module and insert a micro SIM card into the socket.
Next, connect the module’s Tx pin to the Arduino’s digital pin #3, as we will be communicating with the module via software UART.
We cannot connect the module’s Rx pin directly to the Arduino’s digital pin because Arduino UNO has a 5V logic level and the SIM800L module has a 3.3V logic level. Simply put, the SIM800L module’s Rx pin is not 5V tolerant. Therefore, the Tx signal from the Arduino must be stepped down to 3.3V.
There are numerous ways to accomplish this, but the simplest is to use a resistor divider. A 10K resistor between SIM800L’s Rx and Arduino’s D2, and a 20K resistor between SIM800L’s Rx and GND, will work just fine.
The only thing left to do is connect the power supply to the module. We’ve included two different wiring diagrams to show you how it’s done.
In the first diagram, a 1200mAh Li-Po battery is connected.
And in the second diagram, an LM2596 DC-DC buck converter is connected.
Warnings:
- You must be very careful not to disconnect GND before VCC and to always connect GND before VCC. Otherwise, the module may use the low voltage serial pins as ground, causing damage to the module.
- Also, ensure that your circuit and Arduino share a common ground.
Arduino Code – Testing AT Commands
To send AT commands and communicate with the SIM800L module, we will be using the Serial Monitor. The sketch below will enable the Arduino to communicate with the SIM800L module over the serial monitor. Before we proceed with the detailed analysis of the code, connect your Arduino to PC, compile the below code and upload it to Arduino.
Once you open the Serial Monitor, make sure the ‘Both NL and CR‘ option is selected!
#include <SoftwareSerial.h>

//Create software serial object to communicate with SIM800L
SoftwareSerial mySerial(3, 2); //SIM800L Tx and Rx is connected to Arduino #3 and #2

void setup()
{
  //Begin serial communication with Arduino and Arduino IDE (Serial Monitor)
  Serial.begin(9600);

  //Begin serial communication with Arduino and SIM800L
  mySerial.begin(9600);

  Serial.println("Initializing...");
  delay(1000);

  mySerial.println("AT"); //Once the handshake test is successful, it will back to OK
  updateSerial();
  mySerial.println("AT+CSQ"); //Signal quality test, value range is 0-31 , 31 is the best
  updateSerial();
  mySerial.println("AT+CCID"); //Read SIM information to confirm whether the SIM is plugged
  updateSerial();
  mySerial.println("AT+CREG?"); //Check whether it has registered in the network
  updateSerial();
}
Once you have uploaded the sketch, open the serial monitor at baud rate 9600. You should see the output below on the serial monitor.
Code Explanation:
The sketch begins by including the SoftwareSerial.h library and initializing the SoftwareSerial object with the Arduino pins to which the Tx and Rx of the SIM800L module are connected.
#include <SoftwareSerial.h>
//Create software serial object to communicate with SIM800L
SoftwareSerial mySerial(3, 2); //SIM800L Tx and Rx is connected to Arduino #3 and #2
In the setup function, we initiate a serial communication link between the Arduino, the Arduino IDE and the SIM800L module at a baud rate of 9600.
//Begin serial communication with Arduino and Arduino IDE (Serial Monitor)
Serial.begin(9600);

//Begin serial communication with Arduino and SIM800L
mySerial.begin(9600);
Now that we have established a basic connection, we will try to communicate with the SIM800L module by sending AT commands.
AT – This is the most basic AT command. It also initializes the Auto-bauder. If all is well, it sends the OK message, telling you that it is understanding you correctly. You can then send some commands to query the module and get information about it.
AT+CSQ – It checks ‘Signal Strength’. The first number in the output response is the signal strength in dB. It should be more than about 5. Higher is better. Note that this signal strength depends on your antenna and location!
AT+CCID – It checks whether the SIM card is valid or not and sends the SIM card number.
AT+CREG? – It checks whether you are registered to the network or not. The second number in the output response should be 1 or 5. 1 indicates that you are registered to a home network and 5 indicates a roaming network. Any number other than these two indicates that you are not registered to any network.
mySerial.println("AT"); //Once the handshake test is successful, it will back to OK
updateSerial();

mySerial.println("AT+CSQ"); //Signal quality test, value range is 0-31 , 31 is the best
updateSerial();

mySerial.println("AT+CCID"); //Read SIM information to confirm whether the SIM is plugged
updateSerial();

mySerial.println("AT+CREG?"); //Check whether it has registered in the network
updateSerial();
In the loop, we call a custom function called updateSerial() which continuously waits for any input from the serial monitor and sends it to the SIM800L module via the D2 pin (the module’s RX). It also continuously reads the D3 pin (the module’s TX) to see if there is a response from the SIM800L module.
void updateSerial()
{
  delay(500);
  while (Serial.available())
  {
    mySerial.write(Serial.read());//Forward what Serial received to Software Serial Port
  }
  while(mySerial.available())
  {
    Serial.write(mySerial.read());//Forward what Software Serial received to Serial Port
  }
}
Try Sending Different AT Commands
You can now send commands like the ones below through the Serial Monitor to get more information about your network connection and battery status:
ATI – Returns the module name and revision.
AT+COPS? – Checks which network you are connected to.
AT+COPS=? – Returns the list of operators present in the network.
AT+CBC – Returns Li-Po battery status. The second number is the battery level (in our case it is 93%) and the third number is the actual voltage in mV (in our case 3.877 V)
Arduino Code – Sending an SMS
Let’s move on to the interesting stuff. Let’s program our Arduino to send an SMS.
Before trying out the sketch, you’ll need to enter the phone number to which you want to send an SMS. Look for the highlighted string ZZxxxxxxxxxx and replace ZZ with the county code and xxxxxxxxxx with the 10 digit phone number.
#include <SoftwareSerial.h>

//Create software serial object to communicate with SIM800L
SoftwareSerial mySerial(3, 2);  //SIM800L Tx and Rx is connected to Arduino #3 and #2

void setup() {
  //Begin serial communication with Arduino and Arduino IDE (Serial Monitor)
  Serial.begin(9600);

  //Begin serial communication with Arduino and SIM800L
  mySerial.begin(9600);
  Serial.println("Initializing...");
  delay(1000);
  mySerial.println("AT");  //Once the handshake test is successful, it will back to OK
  updateSerial();
  mySerial.println("AT+CMGF=1"); // Configuring TEXT mode
  updateSerial();
  mySerial.println("AT+CMGS=\"+ZZxxxxxxxxxx\"");  //change ZZ with country code and xxxxxxxxxxx with phone number to sms
  updateSerial();
  mySerial.print("Last Minute Engineers | lastminuteengineers.com"); //text content
  updateSerial();
  mySerial.write(26);
}

void loop() {
}

void updateSerial() {
  delay(500);

  while (Serial.available()) {
    mySerial.write(Serial.read());  //Forward what Serial received to Software Serial Port
  }

  while(mySerial.available()) {
    Serial.write(mySerial.read());  //Forward what Software Serial received to Serial Port
  }
}
The screenshot below shows the SMS sent from the SIM800L GSM module.
Code Explanation (Send SMS):
The sketch is almost the same as the first sketch except for the code snippet below. Once the connection is established, we send the following AT commands:
AT+CMGF=1 – Selects the SMS message format as text. The default format is Protocol Data Unit (PDU).
AT+CMGS=+ZZxxxxxxxxxx – Sends SMS to the specified phone number. After this AT command any text message followed by ‘Ctrl+z’ character is treated as SMS. ‘Ctrl+z’ is actually a 26th non-printing character that is described as ‘substitute’ in the ASCII table. Therefore, we need to send 26 (0x1A) at the end of the command.
  mySerial.println("AT+CMGF=1"); // Configuring TEXT mode
  updateSerial();
  mySerial.println("AT+CMGS=\"+ZZxxxxxxxxxx\"");  //change ZZ with country code and xxxxxxxxxxx with phone number to sms
  updateSerial();
  mySerial.print("Last Minute Engineers | lastminuteengineers.com");  //text content
  updateSerial();
  mySerial.write(26);
The loop is kept empty because we want to send SMS only once. If you want to send SMS one more time, just press the RESET key on your Arduino.
Arduino Code – Reading an SMS
Now let’s program our Arduino to read incoming messages. This sketch can be very useful when you need to perform an action like turn ON/OFF lights, enable fan, enable sprinkler system when you receive a specific SMS.
#include <SoftwareSerial.h>

//Create software serial object to communicate with SIM800L
SoftwareSerial mySerial(3, 2); //SIM800L Tx and Rx is connected to Arduino #3 and #2

void setup() {
  //Begin serial communication with Arduino and Arduino IDE (Serial Monitor)
  Serial.begin(9600);

  //Begin serial communication with Arduino and SIM800L
  mySerial.begin(9600);
  Serial.println("Initializing...");
  delay(1000);

  mySerial.println("AT"); //Once the handshake test is successful, it will back to OK
  updateSerial();

  mySerial.println("AT+CMGF=1"); // Configuring TEXT mode
  updateSerial();

  mySerial.println("AT+CNMI=1,2,0,0,0"); // Decides how newly arrived SMS messages should be handled
  updateSerial();
}

void loop() {
  updateSerial();
}

void updateSerial() {
  delay(500);

  while (Serial.available()) {
    mySerial.write(Serial.read()); //Forward what Serial received to Software Serial Port
  }

  while(mySerial.available()) {
    Serial.write(mySerial.read());  //Forward what Software Serial received to Serial Port
  }
}
Once you send SMS to the SIM800L GSM module, you will see the following output on the serial monitor.
As you can see the output response starts with +CMT: All the fields in the response are comma separated where the first field is the phone number and the second field is the name of the person sending the SMS. The third field is a timestamp while the fourth field is the actual message.
Code Explanation (Read SMS):
The sketch is almost the same as the first sketch except for the code snippet below. Once the connection is established, we send the following AT commands:
AT+CMGF=1 – Selects the SMS message format as text. The default format is Protocol Data Unit (PDU)
AT+CNMI=1,2,0,0,0 – Specifies how incoming SMS messages should be handled. This way you can tell the SIM800L module to either forward incoming SMS messages directly to the PC, or save them to the message storage and then inform the PC about their locations in the message storage.
mySerial.println("AT+CMGF=1"); // Configuring TEXT mode
updateSerial();
mySerial.println("AT+CNMI=1,2,0,0,0"); // Decides how newly arrived SMS messages should be handled
updateSerial();
Note that this time we have not kept the loop empty as we are polling incoming SMS messages.
Expanding Arduino SoftwareSerial Buffer Size
If your message is sufficiently lengthy as the one above, you’ll probably receive it with some missing characters. This is not because of a faulty code, but because the ‘Software Serial Receive Buffer’ is filling up completely, discarding the remaining characters.
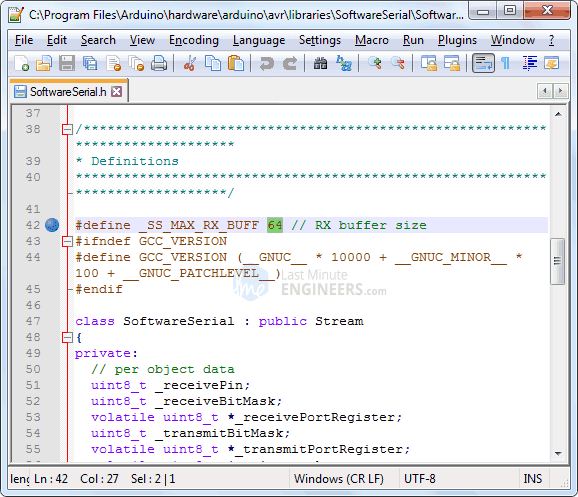
The simplest solution is to increase the size of the SoftwareSerial buffer to 256 bytes from the default size of 64 bytes.
On a Windows PC, go to C:\Program Files (x86) > Arduino > hardware > Arduino > avr > libraries > SoftwareSerial (> src for newer version of Arduino IDE). Open SoftwareSerial.h and change this line:
// RX buffer size
  #define _SS_MAX_RX_BUFF 64
to
// RX buffer size
  #define _SS_MAX_RX_BUFF 256
Save the file and try the sketch again.
Arduino Code – Making a Call
Now let’s program our Arduino to make a call. This sketch can be very useful when you want your Arduino to make a SOS/distress call in case of an emergency like the temperature is exceeded or someone breaks into your house.
Before trying out the sketch, you’ll need to enter the phone number you want to call. Look for the highlighted string ZZxxxxxxxxxx and replace ZZ with the county code and xxxxxxxxxx with the 10 digit phone number.
#include <SoftwareSerial.h>

//Create software serial object to communicate with SIM800L
SoftwareSerial mySerial(3, 2);  //SIM800L Tx and Rx is connected to Arduino #3 and #2

void setup()
{
  //Begin serial communication with Arduino and Arduino IDE (Serial Monitor)
  Serial.begin(9600);

  //Begin serial communication with Arduino and SIM800L
  mySerial.begin(9600);

  Serial.println("Initializing...");
  delay(1000);

  mySerial.println("AT");  //Once the handshake test is successful, i t will back to OK
  updateSerial();

 mySerial.println("ATD+ +ZZxxxxxxxxxx;");  //  change ZZ with country code and xxxxxxxxxxx with phone number to dial
  updateSerial();
  delay(20000);  // wait for 20 seconds...
  mySerial.println("ATH");  //hang up
  updateSerial();
}

void loop()
{
}

void updateSerial()
{
  delay(500);
  while (Serial.available())
  {
    mySerial.write(Serial.read());  //Forward what Serial received to Software Serial Port
  }
  while(mySerial.available())
  {
    Serial.write(mySerial.read());  //Forward what Software Serial received to Serial Port
  }
}
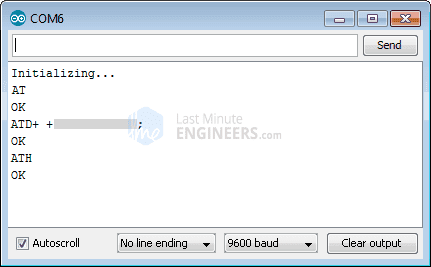
The following screenshot shows a call made from the SIM800L GSM module.
Code Explanation (Calling):
The following AT commands are used to make a call:
ATD+ +ZZxxxxxxxxxx; – Dials a specified number. Don’t forget the semicolon ; at the end of the command.
ATH – Hangs up the call.
  mySerial.println("ATD+ +ZZxxxxxxxxxx;"); //  change ZZ with country code and xxxxxxxxxxx with phone number to dial
  updateSerial();
  delay(20000); // wait for 20 seconds...
  mySerial.println("ATH"); //hang up
  updateSerial();
Arduino Code – Receiving a Call
No special code is required to receive calls; You just have to keep listening to the SIM800L module. You may find this sketch very useful when you need to perform an action when a call is received from a specific phone number.
#include <SoftwareSerial.h>

//Create software serial object to communicate with SIM800L
SoftwareSerial mySerial(3, 2); //SIM800L Tx & Rx is connected to Arduino #3 & #2

void setup()
{
  //Begin serial communication with Arduino and Arduino IDE (Serial Monitor)
  Serial.begin(9600);

  //Begin serial communication with Arduino and SIM800L
    mySerial.begin(9600);

    Serial.println("Initializing...");
}

void loop() {
  updateSerial();
}

void updateSerial() {
  delay(500);
  while (Serial.available()) {
    mySerial.write(Serial.read()); //Forward what Serial received to Software Serial Port
  }

  while(mySerial.available()) {
    Serial.write(mySerial.read()); //Forward what Software Serial received to Serial Port
  }
}
The following output on the serial monitor shows the calls received by the SIM800L GSM module.
As you can see incoming calls are usually represented by ‘RING’ on the serial monitor, followed by the phone number and caller ID. The following AT commands can be used to accept or hang up the call:
ATA – Accepts an incoming call.
ATH – Hangs up the call. On hanging up the incoming call, we get NO CARRIER on the serial monitor indicating that the call could not be connected.


